To connect to a WiFi shore station, the Ubiquiti Bullet is hard do beat. It has the following advantages:
- Very good and powerful transmitter
- Very good receiver
- Can be used outdoor, waterproof and UV-resistant, especially the "Titanium" version
- Has a LAN-ethernet port, can be connected to the boat's internal LAN
- Connects directly to the antenna, no cable losses
- Is Powered-over-Ethernet, to save in cabling
- Runs directly on 12V
Selecting your Bullet
There are several Bullet versions around. Let's look at the options.
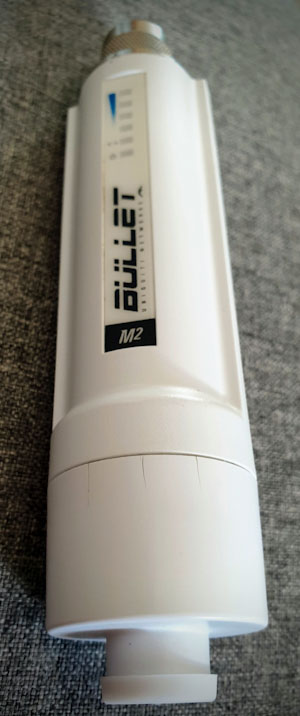
M2 or M5?
The M2 and M5 designation indicates the WiFi-band the device operates on. We can be short on this: If it is your intention to connect to a WiFi shore station, select the M2 version, which operates on the 2.4GHz band. The M5 operates on the 5GHz band, and 5GHz is more suitable for indoors (higher speed) but less suitable for the long range, and there are much fewer (if any at all) 5GHz shore Access Points anyway.
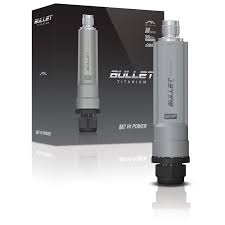
Plastic or "Titanium"?
There are two housing options: the cheaper ones are plastic and the more expensive ones (named "Titanium") have an aluminium housing. The latter also has a better seal for the network cable, but lacks the indication lights. The "Titanium" version also allows higher power than the plastic version. Personally, I would go for the Titanium version.
International version
Different countries have different rules. Some countries allow more channels, other countries allow more transmit power than others. In many countries (notably the US) they want to prevent you from setting up the "wrong" country so only a preset version is being sold. In other countries it is allowed to sell the "international version" which presents a menu on the initial startup where you have to select your country. This is the version you want!
XM versus XW
This is a tough one. The "older" versions are XM, the newer ones have a slightly faster processor and more RAM and are designated XW. The latter is however more difficult to downgrade, and the faster processor and more RAM offer no advantages during normal use. The problem here is when buying a Bullet it is not possible to see from the outside whether it is an XM or XW but only in the webinterface menu.
Downgrading the Bullet
For reasons beyond my comprehension, Ubiquiti at some point decided to drop support for the "older" WPA encryption and only allows to use the more modern WPA2 encryption. The problem for us is that (at least in French Polynesia) there are many Access Points which use WPA instead of WPA2. So, there you are with your fantastic long range Bullet, with good reception of the WiFi Access Point, but you can't connect to it because it uses WPA encryption... The solution is to downgrade the Bullet to an older version.
Although I have not heard anyone bricking a Bullet, in theory it is always possible when changing firmware that something might go wrong causing the device to become permanently unusable. Never interrupt the power when changing firmware. Always confirm that you are using the correct firmware for the type of device.
Downgrading offers an additonal benefit: There is a "hack" which disappeared in the later versions that can be used to "open up" the Bullet so it doesn't lock you into a specific country's rules. More about that later. Let's first downgrade that thing!
How to SSH into the Bullet
SSH is a protocol to establish a secure connection with a remote command line. The Bullet is essentially a linux computer and when we get onto its command line (terminal) we can give more commands than via the web interface.
To connect to the Bullet, you need to know its IP Address, which is "192.168.1.20" after a factory reset, and username and password are both "ubnt".
- On Windows
- You need a program like "Putty" to connect. There are plenty of tutorials on the web how to use it.
- On Linux
- Go to the terminal and type
ssh ubnt@192.168.1.20
When it prompts for a password, type "ubnt" followed by Enter.
- Start up your Bullet and connect to it. Go to the "System" tab, look for the version number of the currently installed firmware. It either starts with "XM" or "XW". It seems that on some Titanium versions it sometimes might start with "TI". Make sure you downgrade to a version where the filename starts with the same ID!
Download the desired firmware onto your local computer. You can try to locate them on the internet or download them from our server:
In the web-interface, under the "System" tab, select Upload firmware
- When uploading is finished, wait for the Bullet to reboot
Alternate ways
It is possible that the web-interface of Bullet refuses to downgrade to a lower version. Fortunately, there is a way around it but you have to type in some commands on the command line of the Bullet.
Alternate way for the XM versions:
SSH into the Bullet (see our note how to do this).
Type the following commands:
wget -O /tmp/fwupdate.bin http://http.zwerfcat.nl/downloads/XM.v5.5.11.bin
/sbin/fwupdate -m
If this doesn't work, you probably have a "signed" version of the firmware installed, and it refuses to install an "unsigned" version. In this case, you first need to install two intermediate versions which allows you to go from "signed" to "unsigned". Type the following commands:
wget -O /tmp/fwupdate.bin http://http.zwerfcat.nl/downloads/XM.v6.0.6-beta.bin
/sbin/fwupdate -m
Then, install the next indermediate version: Type the following commands:
wget -O /tmp/fwupdate.bin http://http.zwerfcat.nl/downloads/XM.v5.6.15.bin
/sbin/fwupdate -m
Now you can install the 5.5.11 version:
wget -O /tmp/fwupdate.bin http://http.zwerfcat.nl/downloads/XM.v5.5.11.bin
/sbin/fwupdate -m
I have seen one version where /sbin/fwupdate did not understand the -m option, if that is the case, then simply leave the -m option away.
Alternate way for the XW versions:
SSH into the Bullet (see our note how to do this).
The XW versions are notably difficult with downgrading, some just refuse. But you can always try. Type the following commands:
wget -O /tmp/fwupdate.bin http://http.zwerfcat.nl/downloads/XW.v5.5.10.bin
/sbin/fwupdate -m
I have seen one version where /sbin/fwupdate did not understand the -m option, if that is the case, then simply leave the -m option away.
Unlocking the Bullet
If you have the international version of the Bullet, you have to select the country on initial startup. And here is the problem: You probably want maximum power (which is not allowed in Europe but only in the US) and you want to have all channels available (which is not allowed in the US but only in Europe), but such a "have it all" country does not exist. Japan comes closes but it has non standard bandwidths. All countries have some kind of limitations. But although our super country without limitations does not exist, we can create such a country.
For this to proceed, it is best to have a downgraded version of the Bullet. In later releases the loopholes are closed gradually and some functions might not work.
The changes are semi-permanent, they survive a reboot, but not a factory reset with the reset button. So it is perfectly safe to try the configuration changes below. If it doesn't work, just factory reset and try again.
The objective here is not to circumvent the law. What we are discussing here is how to use your Bullet when you are sailing the world, encountering dozens of countries each with their own limitations. It is inpractical to completely revert to a factory reset to select a new country, each time you sail into a different territory. With an "unlocked" Bullet, you just select the channels and power you are allowed to use and you can change it on the fly when you enter a new country.
Note: Although the commands below do not result in an error in the US versions and the web interface afterwards indeed shows the extended channels, in reality it doesn't work. The US version is hardware limited not to use any of the extended channels and there is no way around it. You really need the international version for this.
What we are going to use is the "Compliance Test" mode. This mode was made for the engineers to quickly test the Bullet against all kind of limitations posed by the individual countries, hence all limitations are individually selectable. You get even more than that: although the maximum number of channels in even the best countries is never higher than 14, you can now select a few dozen channels! Of course there are no wifi stations in all these extra channels, but if you want to make a private point-to-point connection with two Bullets you can use one of these extra channels.
Important: First, perform a factory reset! You can either select that in the System menu, or by pressing the reset-button for a minute or so.
Confirm in the login-menu that the Bullet asks for your country. Do not enter a country, do not proceed.
Now SSH into your Bullet (see our note how to do this).
On the command line, type:
cd /etc/persistent
touch ct
save
reboot
After the reboot, the SSH connection will be lost (which may result in an error message from your SSH program, just ignore it).
Wait for the device to reboot and then reload the web-interface again. In the country list, there should now be a "country" named "Compliance Test". This is the "country" you want to select.
If you don't see a country named "Compliance Test", execute the following command (without rebooting first):
echo '<option value=\"511\">Compliance Test</option>' >> /etc/ccodes.inc
And reload the web-interface. Now you should be able to select the "Compliance Test" country. After you have selected the new country, in the SSH window which should be still open, you can make the selection permanent by executing the following:
cd /etc/persistent
echo "echo '<option value=\"511\">Compliance Test</option>' >> /etc/ccodes.inc" > rc.poststart
chmod +x rc.poststart
save
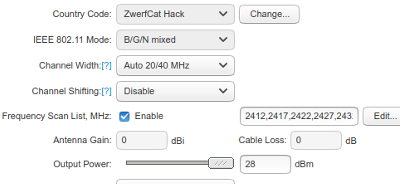
In the "Wireless" tab, you will see a "Country" button that looks like a drop down menu, but it isn't. You have to click the button beside it if you want to change the country.
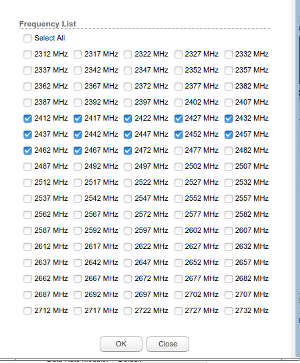
In the "Wireless" tab, you can now click on the "Frequency Scan List" select box, followed by "Edit". You will then get the menu with all the channels, which are now displayed as frequencies. See pictures.
Although now you have a selection of a few dozen channels, I would recommend to only select the 13 frequencies which are normally used. You don't gain anything by selecting the obscure frequencies, many operations will become slower as more frequencies will be scannend for stations which are not there to be found anyway.
What you have achieved now is the option to select full power (up to 28dBm in the Titanium version), the option to select all commonly used 13 channels, and the option to select all existing bandwidths. Cheers!
Tips and tricks
Some software settings you might want to consider:
Disable HTTPS
These days, many browsers automatically try to see if there is a "Secure Connection" (HTTPS) version of a webpage available. The Bullet has one, but the problem is that for HTTPS the security certificate needs to be checked via the internet. If you have no internet, your browser will throw you a fit and yammer about it. So it is best to switch off the HTTPS and just stick with the good old HTTP. You can do this in the "Services" tab, under "Web server", and deselect the "Secure Connection (HTTPS)" option.
Hardware considerations
Before we start configuring the Bullet, it is time to think about the hardware installation.
Antenna
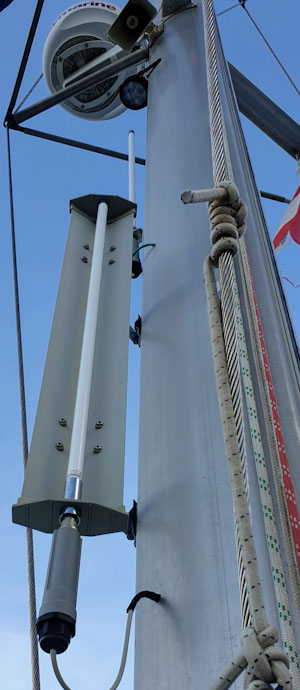
Just above the sector antenna you can see another WiFi antenna. This one is our long range boat WiFi Access Point.
The antenna is the most important part of your installation. Luckily, on 2.4GHz the wavelength is very small, so antenna's tend to be small as well and it is easy to set up a high gain antenna.
Antenna gain
Note that antenna's don't create transmit power, "high gain" simply means that the signal is amplified in certain directions at the cost of a substantial loss in other directions. The radiation pattern of a simple dipole antenna has the shape of a doughnut. A high gain antenna just flattens this doughnut. The diameter of the radiation bulb becomes larger, but less energy is transmitted at an angle. With any antenna with gain, it is important to have the antenna perfectly vertical. I've seen some folks just taping the "high gain" antenna to the back stay, sorry but that is not going to work as the doughnut is now slanted and the majority of the signal is now going into the sea and towards the moon. Also, this means that you should not aim at too much gain (a too flattened beam), as this is at some point going to create problems when the boat is at an anchorage with a lot of swell, resulting in pitch and heel. I use around 16dBi and that works very well on our catamaran.
Antenna directionallity
Instead of an omni-directional antenna you can also use a directional antenna. But since boats tend to swing a lot behind the anchor, you can not really have a too small beam in the horizontal plane, or you need to re-aim the antenna constantly. However, some additional gain in the vertical plane can be welcome. So, what I use on ZwerfCat is an antenna with a relatively large horizontal beam of 120 degrees (which means the wind, and thus the boat, can change 60 degrees in either direction before I loose the connection) and a much smaller vertical beam of 20 degrees (which means the boat can pitch and heel up to 10 degrees in each orientation). A so called sector antenna works very well. With this setup I have succesfully used connections over several miles distance!
A directional antenna has an additonal benefit: it keeps out signals coming from the wrong direction. If I'm connected to a shore station, there are for sure boats behind us who are also (trying to) connect to that shore station. Their signals, which are on the same channel, compete with the signal I'm trying to receive from that shore station. By using a directional antenna I can keep the signals which come from unwanted sources out of my Bullet by turning the "back" of my antenna towards them.
Antenna position
With VHF we want the antenna as high as possible. Due to the curvature of the earth (hello flat earthers!) and the fact that VHF can not bend we can calculate the maximum distance the VHF signal is able to reach. The higher the antenna, the longer the range. If the antenna is on top of the mast, you can reliable cover distances over 20 nautical miles.
Since we are so used to the idea that a higher antenna gives a higher range, some people think this must also be true for WiFi and they go to great lengths to erect the antenna on top of the mast. Well, sorry, this isn't going to give you much benefit. With WiFi you are not going to cover 20 nautical miles anyway, except with a very narrow beam but this requires a very stable platform which no boat can provide. On the boat you are lucky if you can connect to a station a few miles away, and for this an antenna height of two meters or so is sufficient to remain in the line of sight.
More of importance is that the path of the antenna to the connecting partner should be free of obstacles, so no big lumps of metal in the line of sight. Also, water is very good in absorbing 2.4GHz and converting it into heat, which is the main principle of the microwave oven which also operates around 2.4GHz! So this means that a wet glasfiber wall, or a wet bimini are also good in absorbing the signal.
Antenna connection
The WiFi band is on 2.4GHz, this is 2400MHz. We all (should) know about cable losses between the VHF radio and the antenna. You can easily loose more than half the signal between the radio and the antenna. Well, VHF is on 150 MHz, but WiFi is on 2400MHz. On these high frequencies, cable losses are much, much higher. In fact, even the most expensive high quality cable will probably loose already half of the signal within a meter length and within the two connectors. The best way is to use no cable at all, and that is why the Bullet is designed to fit directly onto the antenna. So, no cable between the Bullet and the antenna please.
Electrical power
Make your own PoE-injector
Lost your PoE-injector? You can easily make your own. Just cut 4 wires in a normal ethernet cable, on the Bullet end pins 4,5 must be connected to +12V and pins 7,8 must be connected to GND. On the LAN side, leave pin 4,5,7,8 disconnected.
The Bullet gets its power via the Ethernet cable. This is called Power-over-Ethernet (PoE). The power injector which should be inserted somehow in the ethernet cable specifies that it wants 24 Volt, but luckily, 12 Volts usually is sufficient. On ZwerfCat we run all our Bullets straight from the 12V boat net. The Bullet internally works on 5V and it contains a DC/DC-convertor that converts any voltage above 10V on its input to 5 Volts. However... Ethernet cables were designed to transport electrical signals but not electrical power. The strands are quite thin and electrical power suffers from high losses. If the loss is too high and the voltage drops to 10V or below, the DC/DC-convertor of the Bullet is no longer able to convert what is left to 5Volt and it will start rebooting constantly. So, especially if you feed the PoE-injector with 12 Volts, the cable between the PoE-injector and the Bullet should be kept short. A few meters is ok. But if you were to mount the Bullet on top of the mast, don't expect the Bullet to work properly if the PoE-injector is below the foot of the mast and you are only feeding 12V into it...
Configuration examples
On ZwerfCat we have three Bullets in use, each with a specific purpose. We will discuss them one by one.
Connecting to a shore Access Point
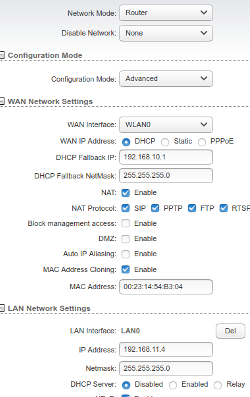
Our "connection" Bullet is our main and most important Bullet. We use it to connect to a shore station and distribute the internet over our internal boat WiFi. All our laptops, mobile phones, tablets, whatever, are always connected to our internal boat WiFi. The Bullet is the only WiFi device to connect to an outside WiFi Access Point. This Bullet is the international version, downgraded and hacked, so it has maximum power and can connect to all existing channels. The relevant settings are:
In the "Wireless" tab
- Wireless mode
- Station
- WDS (Transparant Bridge Mode)
- Enable this only when you are very social. If you enable this, the Bullet will act as a range-extender so that other people can connect via your Bullet to the primary station. The problem with that is that this will cut your band-width considerably. (If you want to act as a relay, a better way to do this is with an additional Bullet you set up as an Access Point.)
- Lock to AP MAC
- If an Access Point has multiple stations, you can lock the connection to a specific Access Point by specifying its MAC address here. You want to do this when a specific Access Point is more reliable or offers a faster connection than the other ones.
In the "Network" tab
- Network mode
- Router
- WAN IP Address
- DHCP. On the WAN side, always use DHCP!
- DHCP Fallback
- This is only necessary in case the Access Point does not provide DHCP, but that would be an error in their setup. You are not going to need it, and if you do, it probably doesn't work anyway. Just copy my settings and forget about it.
- NAT
- Enable. Also enable the NAT protocols on the next line.
- MAC Address Cloning
- This can be handy on some networks. If you buy WiFi access with a mobile device, it sometimes gets linked to the MAC address of your mobile device. If you just transfer the login credentials afterwards to the Bullet, it doesn't work. With MAC Address Cloning you can copy the MAC address of your mobile device and let the Bullet pretend to be the mobile device which was registered for the WiFi service. Of course in that case you should not allow your mobile device connect to that WiFi service anymore as it will create network confusion! The mobile device can instead connect to your internal WiFi without problems.
- LAN Network Settings
- This is the "ethernet end" of the Bullet which should be connected to your internal network. You have to enter settings which match your internal network. I use the network 192.168.11.xx because nobody is using the "11" subnet, so it is unlikely to cause interference with the WAN side. Also I have DHCP disabled because there can only be one DHCP server in the network and that role is already taken care of by my boat server.
Providing an Access Point
Normally for our internal boat WiFi we use a 5GHz device, beause it is faster and causes less interference with the 2.4GHz signals we try to receive, but the range is pretty much limited to our boat. Sometimes however we want to extent our internal boat network, for instance when we want to use our laptop on shore but still use the network and server facilities of ZwerfCat. This is where this Bullet comes into play.
Another use was during the Corona virus outbreak while the whole anchorage was quarantained onto the boats. A lot of boats further down the anchorage had no internet access and I used our Access Point (with permission from the internet provider) to relay the internet to the boats further away.
Relevant settings:
In the "Wireless" tab
- Wireless mode
- Access Point
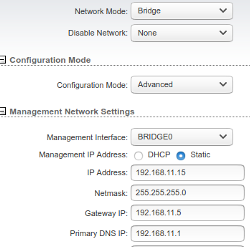
In the "Network" tab
- Network mode
- Bridge
- Management IP Address
- In a simple installation, select DHCP. Otherwise, select an IP address which is in your network but outside your DHCP range. The Gateway is the IP address of the other Bullet you use for receiving the Access Point. For DNS, fill in a known DNS server. On ZwerfCat we have our own DNS server (Pi-Hole) so we use that for providing DNS.
Providing a public hotspot
You are probably not going to need this, but it can be fun if you have a server on your boat anyway. On ZwerfCat we indeed have a server, it runs duplicates of our own websites, it contains wikipedia, a download section for OpenCPN charts, movies, etc. It tends to be populair on anchorages, especially on places where there is no internet anyway.
Don't try to use it if you are not sort of an "advanced" user. To create a hotspot, of course you need to have a server for it to make any sense. The Bullet hotspot only provides access to the server and works as the entry point of a so called captive portal.
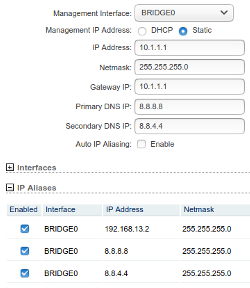
Setup the Bullet as a network "Bridge". Initially I used my own network 192.168.13.x for this, but then discovered that many clients expect a hotspot service to be in the 10.1.x.x range. All right then. Also, it is important to at least add ip-aliases for our fake DNS server at 8.8.8.8 and 8.8.4.4.
What we want it to achieve is that all DNS requests are forwarded to our own DNS server and resolve into the IP address of our webserver, which is listening on 10.1.1.2, 192.168.13.1 and 172.16.1.1. How to setup your own webserver is beyond the scope of this article, but there are plenty of examples and tutorials on the internet.
The Bullet has IP-aliases on 8.8.8.8 and 8.8.4.4 which are the Google DNS-servers. We also advertise these DNS addresses with our DHCP server. Hopefully the client will use these DNS addresses and every request will then resolve to 10.1.1.2 which happens to be our webserver. Some clients don't use the advertised DNS addresses but stubbornly use 8.8.8.8 and 8.8.4.4 but since we have these aliased in the Bullet, we catch them anyway.
Since you are an advanced user, we are not going to tell you how to SSH into the Bullet and how to create some files, we just assume you do!
Create a file /etc/persistent/dnsmasq.conf with the following content:
dhcp-authoritative
dhcp-range=10.1.1.10,10.1.1.240,1h
dhcp-leasefile=/etc/dhcp.leases
dhcp-option=option:dns-server,8.8.8.8,8.8.4.4
dhcp-option=option:ntp-server,10.1.1.2
#address=/clients3.google.com/172.16.1.1
#address=/clients1.google.com/172.16.1.1
#address=/connectivitycheck.android.com/172.16.1.1
#address=/connectivitycheck.gstatic.com/172.16.1.1
#address=/play.googleapis.com/172.16.1.1
address=/#/10.1.1.2
A few notes about this:
- The idea here is to create a network in the range 10.1.1.x, and reroute all requests to 10.1.1.2, which is our server.
- A few lines have been commented out. You can use these lines if you want to capture the connectivity check of certain clients and have your server deal with it. For this to work you have to create an IP-alias of 172.16.x.x. I found the additional complexity not worth the trouble so I commented out these lines.
- I have an NTP server on 10.1.1.2, if you don't have that, remove the associated line.
Create another file /etc/persistent/rc.poststart with the following content:
/usr/bin/dnsmasq -C /etc/persistent/dnsmasq.conf -R
echo 1 > /proc/sys/net/ipv4/ip_forward
This will startup dnsmasq and switch on IP forwarding.
Before you reboot, finish this installation with:
touch /etc/persistent/ct
chmod a+x /etc/persistent/rc.poststart
save
Now reboot (or run the rc.poststart script manually) to start up dnsmasq.
More hacking
The SSH-shell of the Bullet offers some interesting commands:
iwconfig ath0
This shows a lot of interesting info about the wireless interface and allows you to make changes, like:
iwconfig ath0 txpower 8
To see a full list of commands, type:
iwconfig --help
Some other commands:
mca-provision-list
mca-status
Another gem:
athstats
Also very usefull:
ethtool
summary: allows you to view/control ethernet interface stats/settings
more info:
ethtool --help
And what about:
iwlist
summary: allows to to scan for wireless APs, among other things
more info:
iwlist --help
Or:
wstalist
If you want to play with the LED's:
sysled --help
Happy hacking!

